Sustain / Real Bread Campaign / Recipes
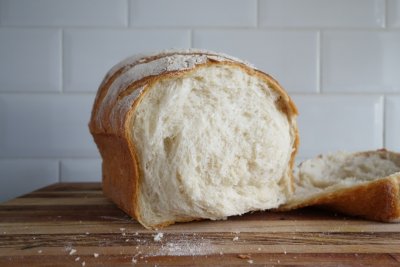
Soft white
A simple step for the fluffiest loaves.


This recipe is the same as for bag o’ bread, just with one extra stage – boiling the water, then using it to make a roux with some of the flour.
In the presence of hot water, crystalline starch granules in wheat flour rapidly absorb water and become blobs of gel. The process also diverts more water away from gluten formation, resulting in a softer, more tender crumb structure. As it bakes hard, gelatinised starch is a key contributor to a glossy, crisp crust. It’s what happens on the surface of bagel dough and inside crumpets as the super-hydrated dough cooks through.
This gelatinisation happens in all dough as it bakes but not to the same extent. It can be increased by mixing flour and nearly boiling water (or even boiling the two together) to form a roux as the first step of bread making. As Dan Lepard notes in The Handmade Loaf, scalding flour is used in some Nordic recipes. The process is now becoming more widely known under its Japanese and Chinese names of yudane and tangzhong, respectively. An example is Hokkaido milk bread, which is a type of shokupan.
Incidentally, starch retrogradation (that is, reverting from a gel-like state back to a stiffer, crystalline structure) is part of what makes bread feel dry and harder as it stales.
Ingredients
Makes three largish (about 800g) loaves
1500g Strong / bread flour (white, wholemeal or a mix)
1000-1100g Water*
20g Salt (about one level 15ml tablespoon)
10g Fresh (or 3.5g fast-acting**) yeast
Optional
50g Milk powder
15g Butter (melted) or oil
These additional ingredients contribute to flavour and softness but are not essential.
*Adjust the hydration (water content) according to how absorbent the flour is and how comfortable you are with ahndling wetter doughs.
**Read the label and avoid any that contains additives, which fall outside the Campaign’s Real Bread criteria.
Method
Boil the water and leave to cool slightly. Whisk the water together with 200g of the flour. Leave to cool to ambient/room temperature.
Mix in the flour, yeast, salt (plus the milk powder and/or butter, if you’re using any of them) until dispersed.
Work/knead the ingredients until they come together as a rough dough but with no dry bits remaining. If it’s too dry and stiff, add a little more water – the wetter the better, frankly. As the dough develops you’ll find that a really wet dough will get less sticky due to the gluten forming and the starch and any bran hydrating. Bran in brown and wholemeal flour really sucks up water, so you’ll need even more than if just using white flour.
Cover the bowl (eg with a shower cap or carrier bag that you can reuse again and again) and leave to rest for half an hour or so.
Scoop the dough out of the bowl (with a wetted dough scraper, if you have one) stretch and fold it in half, then repeat this action a few times. You can find videos demonstrating how on t’internet. Place the dough back in the bowl and cover again.
Leave at room temperature to prove/rise. Depending on what temperature your room is (mine is usually about 19-20°C) this might be seven or eight hours. During this time, repeat the stretch’n’fold action every now and then so it ends up smooth and stretchy by the end.
Divide the dough into three pieces of equal weight (or roughly equal size, at least) and shape however you like eg to put in a banneton, an oiled tin, or free-standing on an oiled baking tray. Again, the intermesh is full of shaping how-to videos. Cover and leave the dough for two or three hours until it’s fully risen.
Heat the oven (with a baking stone or tray in place if you’re proving dough in a banneton) to about 220°C.
If proved in a banneton, turn the dough onto a dusted peel or board. Dust the top of the dough with flour, if you like, and/or slash it with a lame/grignette or super sharp knife and then put straight into the oven.
Bake for 10 minutes, then turn the oven down to 200°C and continue baking for another 25-30 minutes. Turn out onto a wire rack, cover with a clean cloth (eg a tea towel) and leave to cool before slicing – bread can be gummy and lose a lot of moisture (and so stale more quickly) if cut when hot.
Recipe text © Chris Young / www.realbreadcampaign.org
Social sharing
If you make this, please share your photo(s) with the world on social media using #RealBread and other relevant hashtags, linking back to this recipe. Better still if we can see you in the photo, too: #WeAreRealBread!
Please don't forget to tag us, and the recipe's author. You can find us on:
- Twitter: @RealBread
- Instagram: @RealBreadCampaign
- Facebook: @RealBreadCampaign

Published Monday 13 December 2021
Real Bread Campaign: Finding and sharing ways to make bread better for us, our communities and planet.
Support our charity
Your donation will help support the spread of baking skills and access to real bread.


