Sustain / Real Bread Campaign / Recipes
Overnight white
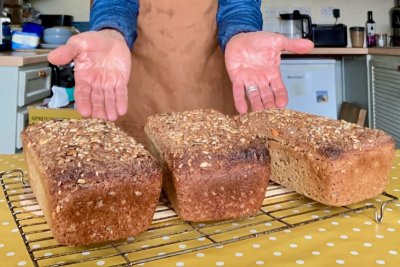
Real Bread with a tiny amount of yeast

This recipe uses a pre-ferment, a method known in Britain as sponge and dough, which is a great way to develop flavour, aroma and texture. Unusually, this version uses no extra yeast in the main dough, helping you to eke out a dwindling supply.
This recipe was published in April 2020 as part of the Real Bread Campaign's #LockdownLoafers initiative.
Ingredients
Makes one large (about 800g) loaf, or a couple of small ones
The sponge
100g Strong/bread, or plain, flour (white, brown or wholemeal)
100g Water
3g Fresh (or 1g fast acting) yeast*
The dough
425g Strong/bread, or plain, flour (white, brown or wholemeal)
250g Water straight from the tap
200g Sponge (ie all of the above)
6-8g Salt (about one level 5ml teaspoon)
*Read the label and avoid those that contain any additives.
Method
Make the sponge by combining the three ingredients in a bowl, covering and leaving for about 10-12 hours (eg overnight) at room temperature, until bubbling.
Weigh the water in a bowl and stir in the salt until dissolved, then mix in the sponge and flour. There’s no need to knead – you can stop once you have a shaggy dough but there’s no dry flour left. If using plain (rather than bread/strong) flour, read these tips on developing gluten.
Cover the bowl (eg with a carrier bag that you can reuse again and again) and leave to rest for half an hour or so.
Scoop the dough out of the bowl with a wetted dough scraper, or your hand, stretch it and fold it in half, then repeat this action. You can find videos demonstrating how on t’internet. Place the dough back in the bowl and cover again.
Leave at room temperature to prove/rise. Depending on what temperature your room is (mine was about 20-21°C when I did tests of this bread) this might be six to eight hours. During this time, repeat the stretch’n’fold action every now and then. You could do it hourly or every other hour, but doesn’t have to be that often.
Shape the dough however you like eg for an oiled tin, banneton, or free-standing on an oiled baking tray. Again, the intermesh is full of how-to videos. Cover and leave for two or three hours until it’s fully risen.
Heat the oven (with a baking stone or tray in place if you’re proving dough in a banneton) to about 220°C.
Turn out the dough if proved in a banneton, dust the top with flour, if you like, and/or slash it with a lame/grignette or murderously sharp knife and put straight into the oven.
Bake a large loaf for about 45 minutes, or small ones for about half an hour. Turn out onto a wire rack and leave to cool before slicing – bread can be gummy and lose a lot of moisture if you cut when hot.
Substitutions
In answer any ‘can I…’ questions about swapping or adding ingredients, the answer is yes, you can. Every tweak creates a different recipe that will give you different results. Seek out those recipes or experiment for yourself and, if you come up with a bread you love, please share it and your tips!
Recipe © Chris Young / www.realbreadcampaign.org
Reproduction prohibited without written permission of the copyright holder.
Social sharing
If you make this, please share your photo(s) with the world on social media using #RealBread and other relevant hashtags, linking back to this recipe. Better still if we can see you in the photo, too: #WeAreRealBread!
Please don't forget to tag us, and the recipe's author. You can find us on:
- Twitter: @RealBread
- Instagram: @RealBreadCampaign
- Facebook: @RealBreadCampaign
Published Friday 10 April 2020
Real Bread Campaign: The Real Bread Campaign finds and shares ways to make bread better for us, better for our communities and better for the planet. Whether your interest is local food, community-focussed small enterprises, honest labelling, therapeutic baking, or simply tasty toast, everyone is invited to become a Campaign supporter.


