Sustain / Real Bread Campaign / Recipes
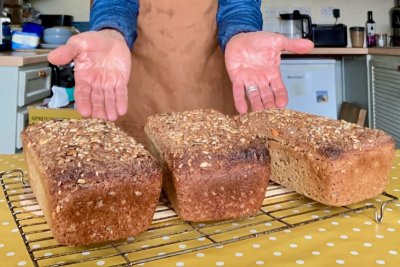
Wakelyns’ wholemeal sourdough
…or, to give its full name: ORC Wakelyns YQ Population wheat wholemeal sourdough tin loaf.

The Wakelyns Bakery team (Henrietta Inman and Maisie Dyvig) say:
“We’re so happy to share this recipe (or formula, as we and other bakeries call it) for our favourite loaf, which smells like honey. You can toast it, sandwich it, butter it, everything it! We love it and hope that you enjoy having this loaf of nourishing, flavourful Real Bread at the centre of your table.
We bake this bread in a tin, specifically one that Small Food Bakery founder Kimberley Bell and we helped Campbell and his team at Rackmaster develop for non-commodity wheat wholemeal loaves. If you prefer, you can prove the dough a banneton and bake it freestanding.”
Ingredients
Makes one large (approx. 800g) loaf
Levain / pre-ferment
75g Wakelyns YQ population wheat wholemeal flour*
25g active stiff sourdough starter (50% hydration, refreshments using 30% starter)
35g water (at room temperature. See baker’s tip below.)
Dough
335g water at around 21°C (a little warmer if your house is cold, a little cooler if your house is warm!)
130g levain (above)
425g Wakelyns YQ population wheat wholemeal flour*
10g sea salt
*You can make this Real Bread using other wholemeal wheat flour, though might have to adjust the amount of water you use as every flour has a different absorbency.
Method
Mix all of the levain ingredients together until well combined, cover and leave at room temperature (see baker’s tip below) to ferment overnight, or for at least 10 hours.
The next day, mix all of the ingredients together using one hand until well combined. Carry on working the dough for around five minutes until the mixture starts to feel springy and doughy, as opposed to crumbly and cakey.
Lightly dampen a work surface and turn the dough out on to it. Roll your shoulders back, stand with your feet shoulder width apart and start to add your energy to the dough by kneading. Depending on your method and vigour, you will need to do this for around 15 minutes. It may feel sticky to begin with but keep going! Try not to add any extra flour or water as this will change the end result.
Over time, the dough will start to become elastic, silky and smooth. You can test the strength of the dough by checking to see if a membrane forms when you gently stretch out a piece between your fingers – what some bakers call the windowpane test.
If you have a dough thermometer you can check the temperature of the dough, which should be around 21-22°C.
Lightly oil a large mixing bowl. Pull the dough across the work surface using a tucking motion to shape it into a round with a slight tension forming on the outer surface the dough. Place the dough, smooth side down, into the bowl. Cover the bowl with a damp teatowel or a lid and leave somewhere that’s around 21°C to bulk prove for about two and a half hours.
Half an hour into the bulk proof, give the dough a stretch and fold. With wet hands gently lift one side of the dough, stretch it gently and fold it back to the centre. Work your way around the dough stretching and folding until you get back to the beginning. Repeat this process half an hour later.
After the bulk proof, lightly oil/grease the tin, turn the dough out on to a lightly-dampened work surface and gently shape it to fit the tin. Not much shaping is required here as the tin will do most of the work! Try to ensure that the dough fits well into the tin, though, and that the top is relatively smooth - but please don’t worry if this is not the case! Cover the tin loosely and leave somewhere warm for around three hours for the final proof.
The dough should rise all the way to the top of the tin before going in the oven. It may take more or less time to prove, depending on the room temperature. You may need to lightly splash/spray the top with water to prevent it from drying out – dough should from a crust during, not before, baking!
Bake at 230°C for around 35 minutes until a deep brown crust has formed and (if you have a baking or meat thermometer) the centre of the loaf has reached 97°C. Remove the bread from the tin and leave on a wire rack (or perched on top of the tin at a right angle) to cool.
As bread can be a bit gummy when it’s just come out of the oven, try to wait patiently until it has fully cooled down before you slice it. It’s difficult but worth it!
Baker’s tip
If the room temperature is cool (eg during colder months), the water should be a little warmer because the levain will take much longer to ferment if it is too cold.
About the bakery
Wakelyns Bakery is a creative space in Suffolk, rooted in a mission to make use of beautiful food diversity, both at Wakelyns Organic Agroforestry and from beyond the farm gate. With non-commodity seed and food diversity and sovereignty at its core, they advocate for agroecological food and farming and its boundless ability to build systems change and just world for all.
Recipe text © Henrietta Inman and Maisie Dyvig / Wakelyns Bakery. Reproduction prohibited without written permission of the copyright holder.
Social sharing
If you make this Real Bread, please share your photo(s) with the world on social media using #RealBread and other relevant hashtags, linking back to this recipe. Better still if we can see you in the photo, too: #WeAreRealBread!
Please don't forget to tag us, and the recipe's author. You can find us on:
- Twitter: @RealBread
- Instagram: @RealBreadCampaign
- Facebook: @RealBreadCampaign
Published Wednesday 8 November 2023
Real Bread Campaign: The Real Bread Campaign finds and shares ways to make bread better for us, better for our communities and better for the planet. Whether your interest is local food, community-focussed small enterprises, honest labelling, therapeutic baking, or simply tasty toast, everyone is invited to become a Campaign supporter.


